

|
Of all the skills that an electronics technician can have, one of the most important is Soldering. Soldering (for the sake of this course, and electronics in general) is the bonding of two metals together in order to form a good electrical connection. Soldering is NOT intended to make a mechanical connection. The mechanical connection should be established long before the soldering is done. A form of soldering is also done in stained glass and plumbing work. If you already know how to do these forms of soldering - forget everything you think you know. It does NOT apply to electronics, and will ruin sensitive circuitry - if not immediately - over time. I've taken courses in precision soldering in the past, and can do 100 pin postage stamp IC's regularly and without any failures. I was certified in MILSPEC soldering techniques and have over 40 years of soldering experience. So you can take my advice on how its done, or you can learn the hard way. That being said - if your workplace has a SPECIFIC set of guidelines concerning soldering - do whay THEY teach you. Otherwise, you will find that the following equipment and methods are by far the fastest, easiest, and most reliable methods to insure a proper solder connection every time. SAFETYNo soldering course would be complete without the ubiquitous safety speech. Sorry - here it goes: NEVER solder on equipment with live circuits. Turning the equipment off is not good enough. Even with the power switch turned off, many kinds of equipment has electricity flowing through it. Make sure whatever you are soldering on is UNPLUGGED and that you have visually and physically insured that it is unplugged and will remain that way while you are working on it. Soldering requires HEAT. Soldering temperatures can be in excess of 400C and will burn the crap out of you! Read: If it is hot enough to melt metal, it is hot enough to melt skin! Never touch the element or tip of the soldering iron. Hold work to be heated with some kind of pliers or clamps. Never hold something that you are soldering on. Always return the soldering iron to its stand when not in use. Failure to do so can start a fire! Turn soldering equipment off and unplug it when not in use. Assume that if it is plugged in, it is turned on! Soldering involves chemicals that can spit or sputter, and my come into contact with your clothing, hands or eyes. Take proper precautions. Some work places require the use of eyewear (goggles), gloves, or even special breathing aparatus. Use common sense and your best discretion, and I am not held liable for anything that you do. You screw up - you own it. Keep any and all cleaning solvents in well labeled containers. Finally, always wash your hands with soap and water after soldering. Nobody wants to eat their work. EQUIPMENT First - you need to start with the right equipment. There was a time when you could use a thick, hefty screwdriver heated over hot coals to do soldering. That might be great for doing stained glass work, but if you try to use that on a transistor - you'll be buying a new transistor, and perhaps a whole new circuit board! At the same time, schools, parts manufacturers, and even employers will suggest that you purchase the most recent, most expensive soldering and rework stations known to mankind. If you follow their suggestions, you will doll out about $500 for a usable "solder work station". Will it do the job - depends on the job! Instead - I offer an inexpensive "comprimise", that will allow you to easily handle 90% of all electrical soldering you will encounter in your lifetime. Here it is: First - you need to start with the right equipment. There was a time when you could use a thick, hefty screwdriver heated over hot coals to do soldering. That might be great for doing stained glass work, but if you try to use that on a transistor - you'll be buying a new transistor, and perhaps a whole new circuit board! At the same time, schools, parts manufacturers, and even employers will suggest that you purchase the most recent, most expensive soldering and rework stations known to mankind. If you follow their suggestions, you will doll out about $500 for a usable "solder work station". Will it do the job - depends on the job! Instead - I offer an inexpensive "comprimise", that will allow you to easily handle 90% of all electrical soldering you will encounter in your lifetime. Here it is:
Begin with a MODULAR solder iron. Why modular? Because it is versital, because it configurable, and because it will serve you well for the rest of your life. You want a handle with a GROUNDED plug. I suggest something along the lines of a Weller 7400. (I use Weller numbers here for convenience and reference. Whether you use Ungar, or some other brand is not important. If the solder iron you get has the same specifications, you'll do fine.) Put a 45 Watt Heating Element on the Handle, and finally a 1/8 inch "screwdriver" type tip. For reasons I'll explain later, pencil tips are only to be used for extremely fine soldering, and frankly - I find them useless. Chisel tips should be reserved for thick "Ground" soldering. For your convenience - here is a parts ordering list. Again if you want to go with another brand, you'll be ok as long as the equipment you purchase matches the specifications of the equipment I have given:
A "Cool" ModificationOne of the things I always thought was a pain was the warm up time for a solder iron. Also, sometimes (but not very often) you may want to use a cooler solder iron. A fix for both of these problems was a magic little box I made to go between my solder iron, and the wall jack.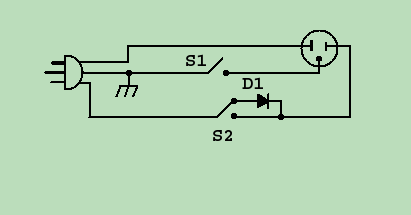 The box is a standard electrical outlet JBox with a power plug going in, an outlet jack, and 2 toggle switches. The Grounded 115 Volt power cord comes into the box. The green wire is grounded to the JBox chassis. The white wire is connected to the neutral side of an outlet jack (the silver screw - or the LARGE flat connector). The black wire goes to a SPDT toggle switch(S2). The two "outputs" of the toggle switch has a diode run from one ouput to the other, and the second output also has the black wire running to the "hot" side outlet jack (the gold screw). There is a second toggle switch (SPST S1) with one side connected to ground and the other side connected to the ground wire on the outlet jack. So from the outlet jack's point of view - it is connected to a toggle switch on the hot side (black), a toggle switch on the ground side (green), and the neutral (white) wire runs straight through. The box is a standard electrical outlet JBox with a power plug going in, an outlet jack, and 2 toggle switches. The Grounded 115 Volt power cord comes into the box. The green wire is grounded to the JBox chassis. The white wire is connected to the neutral side of an outlet jack (the silver screw - or the LARGE flat connector). The black wire goes to a SPDT toggle switch(S2). The two "outputs" of the toggle switch has a diode run from one ouput to the other, and the second output also has the black wire running to the "hot" side outlet jack (the gold screw). There is a second toggle switch (SPST S1) with one side connected to ground and the other side connected to the ground wire on the outlet jack. So from the outlet jack's point of view - it is connected to a toggle switch on the hot side (black), a toggle switch on the ground side (green), and the neutral (white) wire runs straight through.
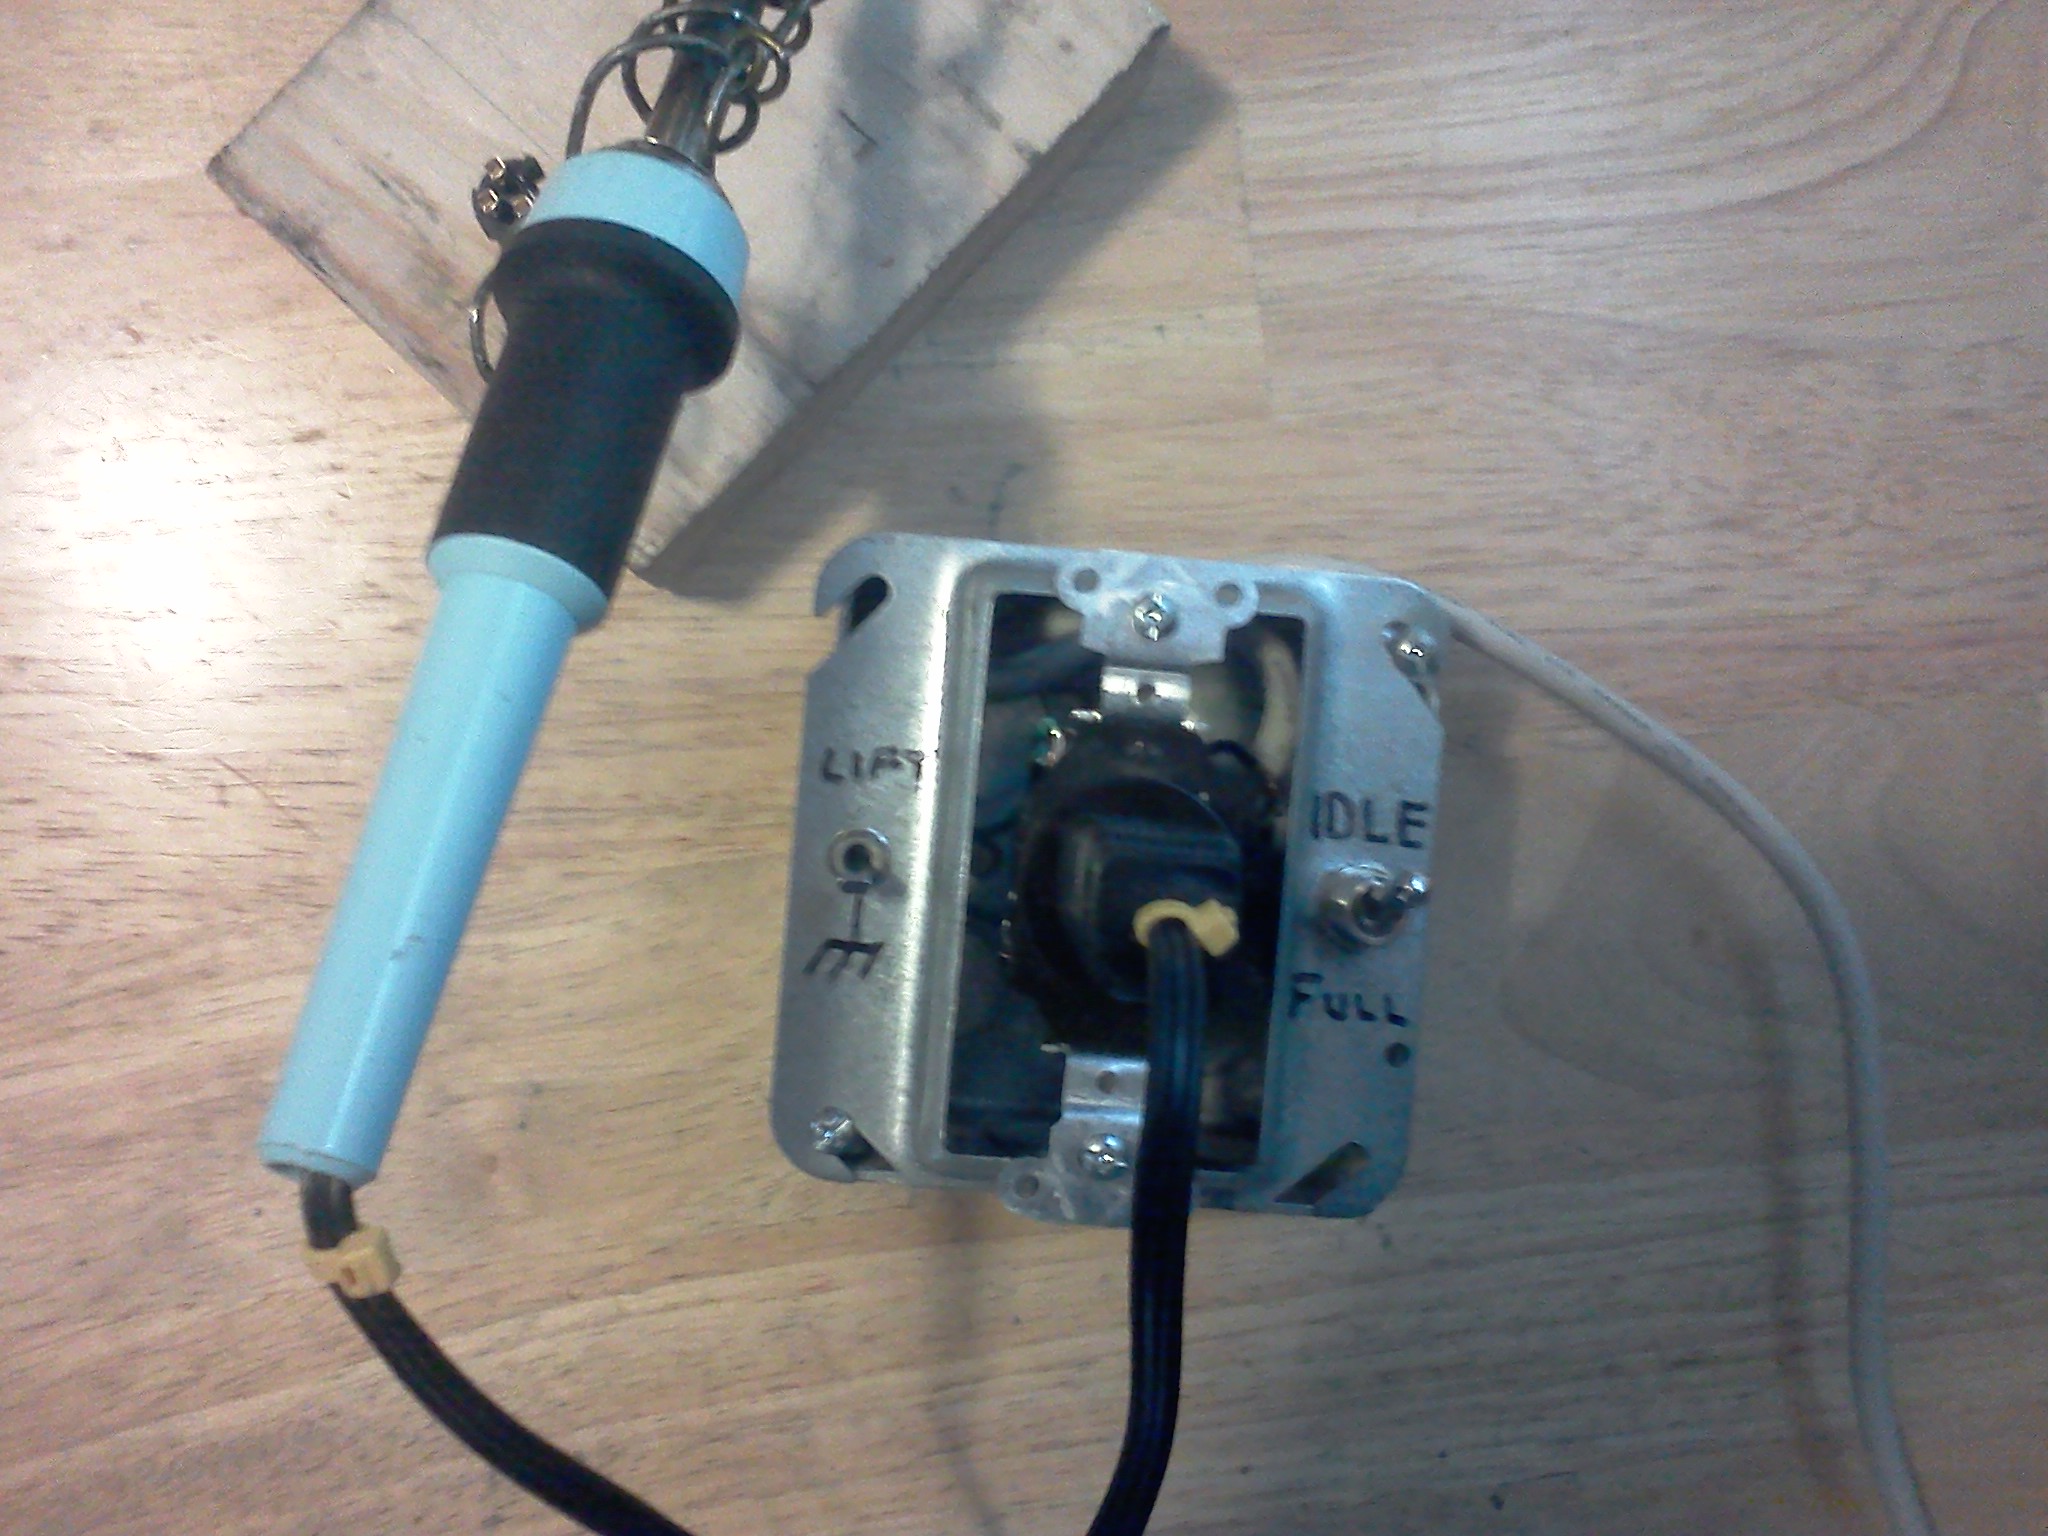 Basically, it works like this: You plug it into the wall, and plug your 45 Watt solder iron into it. One toggle switch is a "ground lift" for if you are soldering on "hot" grounded equipment. If you use a grounded solder iron on this equipment, and it happens to be plugged in - you are likely to take a healthy jolt, if not destroy the equipment. So the purpose of switch 1 is to remove this possibility by simply lifting the ground on the solder iron via a toggle switch(S1). Basically, it works like this: You plug it into the wall, and plug your 45 Watt solder iron into it. One toggle switch is a "ground lift" for if you are soldering on "hot" grounded equipment. If you use a grounded solder iron on this equipment, and it happens to be plugged in - you are likely to take a healthy jolt, if not destroy the equipment. So the purpose of switch 1 is to remove this possibility by simply lifting the ground on the solder iron via a toggle switch(S1).
The second switch (S2) is used as an "idle" switch. In its normal position, 115 Volts is applied to the "hot" lead of the solder iron, and allows the soldering iron to run at a full 45 Watts. When you flip the switch into "IDLE" mode, the diode kicks in and only allows 1/2 the Voltage to go to the iron, making it run at a lower voltage. Now your 45 Watt iron is running at about 1/2 heat (about 23 Watts), which makes it heat up to full temp much quicker when you flip the switch to its "FULL" position. As a side effect, in the IDLE position, it is very nice for use on heat sensitive equipment, where you might be told to use a 23-25 Watt iron. Also - in my particular case, I used a 3 position switch, and the third (center) position acts as an "off" switch. I thought about putting a light in line with the output so I'd know if it was on or off, but I decided not to. Another (wise) modification to this box would be to add a fuse in line with the INPUT side of the black wire (before the switch), so that if something should happen to go wrong with the internal wiring, it will simply pop the fuse. So with the simple addition of a toggle switch and a diode - you now have 2 solder irons. A 45 Watt, and a 23 Watt - both with an optional ground, and interchangable tips! |

| (On The Following Indicator... PURPLE will indicate your current location) | |||||||||||||||||||||||
| 1 | 2 | 3 | 4 | 5 | 6 | 7 | 8 | 9 | 10 | ||||||||||||||
[COURSE INDEX] [ELECTRONICS GLOSSARY] [FREE ONLINE ELECTRONICS COURSE] [HOME]
| Otherwise - please click to visit an advertiser so they know you saw their ad! |
