

Home Made DiodesCat's WhiskerDuring World War II, amateur (ham) radio operators were enlisted into service in the military. Hungry for news from home, wanting to know what was going on along the front, and hopeful to hear a glimpse of what the enemy might be up to, they began to use their radio knowledge to fabricate radios out of what they had around them. This became the beginnings of the Signal Corps.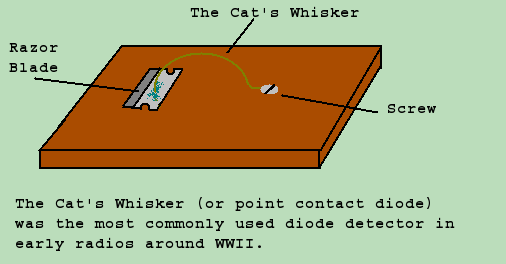 They knew that having a diode meant the difference between having or not having the ability to detect a radio signal. As of yet, a method of mass manufacturing of semiconductor diodes had not been invented, and tubes were not available on the front line. They didn't have access to materials they had at home, like pyrite, galena, or silicon, and 30 guage phosphor bronze wire - so they got inventive. They knew that having a diode meant the difference between having or not having the ability to detect a radio signal. As of yet, a method of mass manufacturing of semiconductor diodes had not been invented, and tubes were not available on the front line. They didn't have access to materials they had at home, like pyrite, galena, or silicon, and 30 guage phosphor bronze wire - so they got inventive.
With knowledge that many different crystalline materials have semiconductive qualities (the ability to rectify - or turn AC into DC), they embarked on a path to find what they had around them that they could use. The oxides of metals are crystalline in form, and many metals have oxides (rusts) that have the ability to rectify. They tested with sardine cans, forks and knives. What they found to be most effective out of what they had - was the "Gilette Blue Blade Razor" - a commonly used razor blade at the time. The inexpensive steel razor blades (which in the riggors of war get rusty) would have blue oxidized spots on them. If they took a fine piece of wire (usually copper or steel) and coiled it in such a way that it acted as a weak spring, then touched the pin-point tip of that spring to JUST THE RIGHT SPOT (more luck than skill was involved), it would act as a diode. The crystallized blue metal oxide surface was actually a semiconductive surface, and they simply needed to make contact exactly correctly in order to obtain a "junction". Only certain places on the crystal would function as a rectifying junction, and the exact geometry and pressure of the contact between the wire and the crystal was important. Mostly by trial and error, a usable point was eventually found, and because it required much patience, they developed a way to make the chore easier. Using a thin but springy wire (brass bristles out of a brass brush were found to be the best in the foxholes, because they worked well and were plentiful) a "whisker" was bent and screwed down to (usually) a piece of wood. The other end of the "spring" would be bent in such a way that it would just barely come into contact with the razor blade. If you moved the razor blade under the spring, eventually it would come into contact just exactly right - and then you didn't touch it, or everyone in your foxhole would beat the crap out of you, because a good contact could be lost by even the slightest vibration. For reason of description, the contact was commonly called a Cat's Whisker, although the correct term would be a "Point Contact Diode", and only once semiconductors began to be more widely studied, did it become known as the Schotkey Barrier Diode. Over the years, many different kind of materials were used in the Point Contact or Cat's Whisker diodes, to includ pyrite (fool's gold), galena (lead sulfide), graphite, which leads me to my next adventure: Copperas DiodesMany different crystalline semiconductor materials have the ability to rectify (turn AC into DC). One I found along the way was cuprous oxide. Cuprous oxide is the "rust" of copper, which can be produced purposely by heating copper and letting it cool quickly, especially in the presence of a salt. I was in a very old house with screw in fuses. Shortly after moving in, the 100 Watt light bulb in the living room started glowing at about 1/2 its normal brilliance when I would flip on the light. The bulb and socket checked out just fine, except there was only about 70 volts in what should have been a 120 volt light socket. I went down and checked the fusebox, and tested the fuse with an ohm meter (perhaps it had somehow gone resistive?). Everything checked out fine. After finding nothing wrong, I screwed the fuse back in, I went back into the living room, and the light bulb was working fine! Some two weeks later, I had the same problem, but this time when I looked at the fuse box, I took a flashlight with me. Interesting, I saw a blackish green coating of gunk on the inside of the fuse socket. After I shut the power to the whole house off, and carefully scraped off the gunk to reveal clean copper - I never had the problem again. What was happening was the copper oxide was acting as a diode, effectively cutting the voltage in half. Mason Jar Diode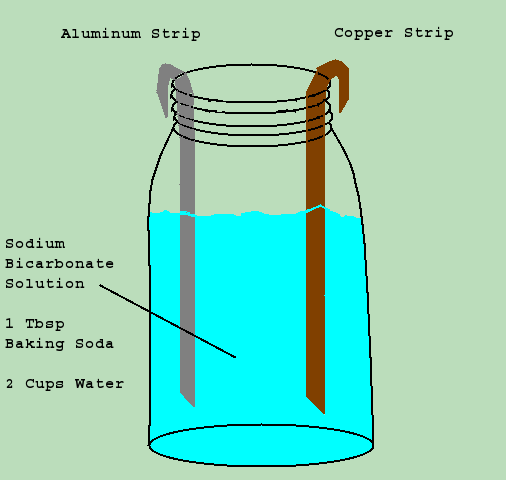 Along the way of playing with making and testing with Baking Soda Capacitors, I used different metals and purely by accident, I once used aluminum on one side and copper on the other. What I found out was that this particular combination did not act like a capacitor at all, but rather exibited rectifier like properties. Along the way of playing with making and testing with Baking Soda Capacitors, I used different metals and purely by accident, I once used aluminum on one side and copper on the other. What I found out was that this particular combination did not act like a capacitor at all, but rather exibited rectifier like properties.
I had somehow stumbled upon a different combination that acted like what used to be called a borax rectifier, otherwise known as a "mason jar" or "slop jar" rectifier. The slop jar was filled with water and "Mule Team" borax (a laundry detergent). With a copper plate on one side and an aluminum plate on the other side, it acted like a diode. Baking Soda could be used as a substitute if you didn't have Borax, and seems to work nearly as well. Borax Rectifiers (or Baking Soda Diodes) were often used in the early days of radio as a means of converting wall AC power to a DC power for use in radio systems. They would simply plug a couple of these babies into the wall, and plug the output into their radio transmitters. As such they drew a lot of current, and would actually heat up the water. In times when these were used, ham radio operators reported that the water would heat up to a point where the electrolyte reached 140 deg. F. The electrolyte would begin to visibly evaporate at that temporature. Those using them would pour a thin layer of mineral oil on the surface of the electrolyte to reduce evaporation. In the future, I play to experiment with zink coated metals and various other salts. Experiments:Making a Fox Hole Radio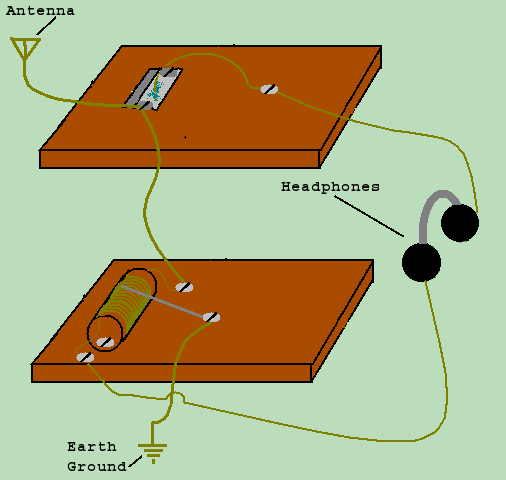
| |||||||||||||||||||||||||||||||||
[COURSE INDEX] [ELECTRONICS GLOSSARY] [HOME]
| Otherwise - please click to visit an advertiser so they know you saw their ad! |
This Course was written by Ray Dall © All Rights Reserved.
This page and all its content Copyright, Trademarks, Intellectual Properties
and other legal issues 1994, 1995, 1996, 1997, 1998, 1999, 2000, 2001, 2002, 2003, 2004, 2005, 2006 Ray Dall.
All Rights Reserved.
And for what it's worth... this page was last updated HexDate 01-11--7D1
